28 May, 2015

Wedding gift - Ork Shield

Friends of mine where getting married & I was at a loss as for what I could get them. Then it hit me "Make them something!" I don't know where the idea of making an Ork shield, based off a tattoo the brides has, came from but they love it so that's all that matters!

Sadly, this idea to make them a gift came 3days before the wedding. Happily I already had Eva foam mats at home & I know I could cut, shape & paint them quick & easy enough to make this work

First things first was the size & a stencil for the Ork face.

Cut from Eva foam I then planned out the checkered pattern on the shield.

I wanted to make it a piratey looking crest so I cut out & shaped these Ork Choppa & Chain Sword parts to add as cross guards behind the shield. Again, these pieces where stenciled out, & I used a dremel to add in all the damage detail & shape the blade, spikes & handles.

These being an Ork shield I cut a section of the shield out, making it look broken, then added some spare scraps over it to give it a bolted back together look.

I used a 9mm plywood board, hot glued to the back, to make it nice & stiff & easier to mount on a wall

Then it was a simple matter of gluing the rest of the pieces in place. Once I got to this stage, & after the glue was dry, I went back over with my dremel to add in the "battle damage" scrapes & cuts to give the shield a better look as I knew I wanted to weather it heavily later on when painting so have a lot of pre-made scars helps with that.

 Then time for a few coats of black primer & the painting can begin!

Nice bright base colours to begin with, very unOk like .

& now every prop makers favourite  part, weathering! I have learn a huge amount of tricks over the years on how to get a realistic worn metal paint job. Both from trial & error, practises & fellow Master Prop Maker Volpin Props & Chinbread.
 

Nice blood one the teeth there

The worn away metal look is something I really happy with on this build.

& here we have the finished piece. Not shown as the two little D rings & added to the back so that it can be hung on a wall.

Transporting this thing was a game in itself! I have to make a custom box, for left over Eva foam as inserts to that the sword handles & blades would not get damaged. Over all I loved making this thing & with that little time I had I am really happy with how it turned out.

I plan to make a few more of these guys, smaller next time & in a merriment of different designs from Zelda to Pokemon to Assassins Creed & everything in-between

-M

28 April, 2015

Jervis Shopping Centre Christmas display

While working at Prop Me up I got to build a 20meter "Wall of Ice" as an entrance walk way to lead to their Santa Grotto.  It is was my first build while working with them & I learned some quick & hand tricks when working with fiberglass that I'll use in the future.


Each section of wall was carved out of Styrofoam blocks, we got two per sheet.

Once the basic shape was done they where carved up to give the impression of icebergs. Since this was going to be two long walls of ice each end was carved so that it match in hight & detail so it match the next piece.


Two quick coats of Jesmonite later, tinted blue to make the applying that much visually easier, & the block is ready for fiberglassing.
A singe layer, done is two stages, first the front, then the back, with the help of heat lamps in between to speed up the curing stage was all that was need to cover the blocks. Fiberglass paper was also applied before the resin dried to help keep the fiberglass as smooth as possible. Once it was fully cured a light bit was sanding was involved to get rid of all sharp edges, air bubbles & bits of fiberglass left sticking out.

One last coat of resign, mixed with a smoothing agent to coat the fiberglass to make it ready for painting. This is where the heavy sanding is involved. These blocks where going to be out in public, in a shopping centre, with loads of kids walking by them. We hand to make sure every square inch of them was perfectly smooth so that little fingers woould not get cut on them.

Then once finished, repeat 20 more times. The main problem with this project was space. By the time I was done making the last few bricks we where running out of places to store them.

Then it was off to painting. Just a base coat of blue& streaks of dark blue & white for highlights. Here they are all laid out in the Jervis Shopping Centre


28 November, 2014

40K Tech-Priest Mechanical Arm costume piece

I was commissioned to create a full arm costume piece for a LARP been help at a gaming convention, called Gaelcon.  I was given free range when it came to creating the design of the piece as the guy knew I understood the 40K design elements.

This was a quick build as I got the finally go ahead two weeks before the convention, but I've built these pieces before so I knew I could do it.

The whole arm was made out of 2mm craft foam, with each piece hand cut out. I started with the gauntlet, using a wooly gloves as the base. Each piece was blocky, showing it was good solid metal :

Damaging up the arm was done to show that it this was used, in day to day life, as very little in the 40K universe is very clean & shiny. The extra detail of nuts & caps, on the fingers, gives a better metal feel.

Second was the lower arm. I wanted this to have the feel of layers & depth. Showing that there are working pieces underneath:
 

The next step is once again damaging. This involves taking a dremel, crafting knife & sandpaper to the foam & wires. Not damage is too severe as some of it is going to be lost during painting:

Lastly the upper arm. This I made to be just a simple overlapping armour pieces, to give the feel that it can move but there is also more, important, working pieces underneath:


It was tricky to get the shape & measurements just right for this one so that is would sit correctly on the person, it's why I made it flat first before heat gunning it into shape:
 
Once all the pieces where finished & heat gunned into shaped I added elastic straps, to the inside, so they could be worn without people seeing how they are held on.  Once the glue was set it was onto the third phase, painting:

 
Each piece got a base coat of black then metallic silver was dry brushed on to highlight all the damaged areas.
Then I just kept going over & over the model with darker & darker shades of the metallic sliver, eventually using small amounts of pure black acrylic paint, to weather & dirty the prop to show it is well used & worn.


Lastly I dabbed on some white along the edges & deep scar marks for extras highlights & some brass paint for "metal on metal" damage weathering.

Here is all three pieces layout:


& here it is on the happier customer:
The fit was perfect, which was the one thing I was really worried about this build.  I learn a few things while building this which I am going to use them when I build the Winter Solider arm, which I really hope is soon.


-Matty

05 September, 2014

Golden Blaster Award statuette.

I was hired by the organizers of this years EuroCon, Shamrokon, held in Dublin on the 22th-24th of August, to create 4 statuettes for their annual short Sci-Fi film festival, called the Golden Blaster. I worked with one of the heads of the con to create the look of the blaster.


Each aspect of the blaster had mutability designs done of them, & he choose which he liked best. They were then collected all into one design, had it okay'd & then set about creating.

The master prop was build from balsa wood as I've worked with it on other similar project like this in the past, so I'm comfortable working with it. The fin, body & handle were all carved out of the material separately & then glued together.


The nozzle & back end were then carved up & attached, then the whole body was covered in polyfiller, sanded to a smooth finished & primed.


The next stage was to mold the blaster as I needed to make four copies of it. This is always the scariest part of prop building for me & the messiest. If anything goes wrong during this part of the build it will damage the master prop, but it will also cost me a fortune in materials. Seeing the shape of the blaster this had to be a two part mold.

I clayed up and boxed in the first half. This can normal take between two & three hours to set up as you make sure that the clay is level, you got the mold at the halfway mark & all the edges are perfectly done so that there will be no silicon leaked. I used Supersil 20 Silicone for the mold. It is a 10:100 mix silicone & one that I have used before & I've always been happy with the results.


Happily, after 12 hours of curing, the mold turned out perfect. It was then a simple matter of, cleaning up the master prop, reapplying some poly-filler that had come off in the clay, flipping everything over & casting the second half.


I then did a test cast, using the fast cast polyurethane 1:1 resign I have used many a times in the past. I sloshing some of the resin around the mold to both clean it out & see how well it nozzle preforms. Once I was happy with that it was a simple matter of casting four of the blaster, priming each one and then  painting them up. Three of the statuettes need to be gold & one silver. I found a wonderful spray paint called "Hardcore", which comes in a multitude of colours as well as chrome silver & shinny gold, which is the look I wanted.


Once the painted had cured I coated them all in a few layers of Gloss Varnish to seal them in & brought them down to a trophy shop the Con directors where using to have their bases fitted. The next time I saw them was at the convention on display.


I was pleased with how these turned out & with the positive reaction people had when they saw them at the Shamrokon. I''m starting to feel like making prop ray-guns could be my main field of interest over the next while =]

-M


11 November, 2013

Dark Heresy LARP Boltpistol

This was a personal project I build for a month Dark Heresy LARP I game in.  Been a LARP, costume is encourage and I knew my next character would have a Boltpistol in game so I wished to make one for my costume.

I went for balsa wood as the making build material for the pistol. I knew that it would be a bit delicate but it was the easiest material to work with so it was a chance I was willing to take. This scale is correct to what you would find in the RPG books, which is hugely over sized. The pistol is 4inces across and 13inches long.  I had build a HeavyBolter before so I knew how to go about making the base structure for the prop.
 

The pistol grip was the only real tricky part of the build. Getting the size and shape just right so that my hand fit around it naturally.

An extra layer of wood for the detail of the body, the grip sanded down and the magazine fit in nicely.

I made the mag separate as I want to be able to make a mold of it and cast a few extra ones to carry with me at the LARP.

Bolt pistols are normal coloured red or blue on the upper layer so I went for red. And seeing as how this is a weapon from the 40K Universe one always needs a add a skull or two.

A metal finish was added to the rest of the gun. This involves getting an old worn out brush and specking on silver paint in a few layers. It quite fun but takes a number of layers of paint to get looking right.

& here is the finished piece:


I know that more detail can be added to it & I will at a later time but I'm happy with how this guy turned out

-M


Gentleman's Atomic Ray-Guns for Desert Bus for Hope Charity.

For those of you that do not know Desert Bus for Hope is a charity event run by the wonderful Loading Ready Run guy. It is all in aid of the Penny Arcade Childs Play charity.This will be my forth year watching this guys play the game Desert Bus for 24hours a day until people stop giving them money. So for this year I decided to go all in and made something for them to auction off. Seeing as how I like my weapon props I went with a pair of dueling pistols. But not just any pistols! Steampunk Atomic Ray-gun pistols!!! =]

My plan was simple, build the prototype out of balsa wood and odds and ends, mold it and then cast two pistols. This was a big step for me in my prop making career as I knew it would involve a two part mold, which I'd never done before.

To start I Google searched "Dueling Pistols" and "Ray-Guns" and took the most common elements from the two and work a design that was inspired from both. A long elegant body, fin, piping and glass tube where elements I knew had to be in the design.
 

The grip was the most nerve wracking part to dermal out as the lines had to be prefect.
 

Suitable sci-fi themed barrel made from washers, pipe and a foam ball.
 

One of the key elements I wanted on the gun was a power/temperature gage, where the piping would could out of. This would give it the steampunk feel I was looking for. A similar gaga was added to the back of the pistol.

Here is the prototype finished and ready for molding. The extra piece at the fin is where the glass tube will fit. I have a number of them in a box just waiting for this type of project to  come along.


Ready for molding. I had seen loads of these been made by fellow prop makers viva their photos on twitter so I knew what to do. Doesn't mean I was scared I'd get something wrong or mess up in some way.

After the first 1kg of silicon pored in I realized just how much this was going to take to make the mold for this gun. And just how much is was going to cost me =[ But, it's for charity! So what if I end up eating noodles for a while.
 

5kg of silicon later and both half's of the mold where finished. Just before I started on the second half I messaged Bill Doran (@chinbeard) to ask a very important question, how do I stop the two half's from sticking together. He did in fact answer me so I got to skip the horror of having the mold be one huge mass.

And here is the first pull from the molds. Turned out perfect with very little clean up to do after wards.
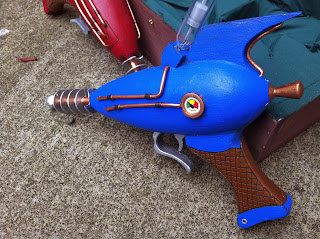
Both gun primed and in the base coat colours. Why Red and Blue? Because in the gaming world it is always Red Vs Blue. Plus I am a huge Team Fortress 2 fan.

The temperature gage detail

And the "other" gage detail. In this you can also see the holes that had been drilled out for the piping to go along the outside. I didn't build these into the prototype as I wanted to have the freedom of been able to add in piping where ever I though it would look good. It also means on future pulls I can change around their design as I see fit.

I don't know what this does, but it is set quite high!

Working out placement of the pistols in the display box.

This was a nightmare to make. Getting the shape just right. Cutting out the dozen or more wall pieces. Getting the green cloth lining to sit smoothly on it! The only way I was able to make it was using balsa wood, but that also make it hugely fragile.
 
This turned out almost the way I wanted it.
 

The display case, all varnished up and ready for shipping.
 
And here we have the finished props in their display case.


I learned a great deal from this build. What to do and of course what not to do and more importantly what not to forget when you are at certain stages of the build.  I really hope that the people at Desert Bus like it and more importantly that it makes a decent amount for the chairity.

You can see the auction here on their site: Desert Bus Silent Auction

-Matty