For those of you that do not know Desert Bus for Hope is a charity event run by the wonderful Loading Ready Run guy. It is all in aid of the Penny Arcade Childs Play charity.This will be my forth year watching this guys play the game Desert Bus for 24hours a day until people stop giving them money. So for this year I decided to go all in and made something for them to auction off. Seeing as how I like my weapon props I went with a pair of dueling pistols. But not just any pistols! Steampunk Atomic Ray-gun pistols!!! =]
My plan was simple, build the prototype out of balsa wood and odds and ends, mold it and then cast two pistols. This was a big step for me in my prop making career as I knew it would involve a two part mold, which I'd never done before.
To start I Google searched "Dueling Pistols" and "Ray-Guns" and took the most common elements from the two and work a design that was inspired from both. A long elegant body, fin, piping and glass tube where elements I knew had to be in the design.
The grip was the most nerve wracking part to dermal out as the lines had to be prefect.
Suitable sci-fi themed barrel made from washers, pipe and a foam ball.
One of the key elements I wanted on the gun was a power/temperature gage, where the piping would could out of. This would give it the steampunk feel I was looking for. A similar gaga was added to the back of the pistol.
Here is the prototype finished and ready for molding. The extra piece at the fin is where the glass tube will fit. I have a number of them in a box just waiting for this type of project to come along.
Ready for molding. I had seen loads of these been made by fellow prop makers viva their photos on twitter so I knew what to do. Doesn't mean I was scared I'd get something wrong or mess up in some way.
After the first 1kg of silicon pored in I realized just how much this was going to take to make the mold for this gun. And just how much is was going to cost me =[ But, it's for charity! So what if I end up eating noodles for a while.
5kg of silicon later and both half's of the mold where finished. Just before I started on the second half I messaged Bill Doran (
@chinbeard) to ask a very important question, how do I stop the two half's from sticking together. He did in fact answer me so I got to skip the horror of having the mold be one huge mass.
And here is the first pull from the molds. Turned out perfect with very little clean up to do after wards.
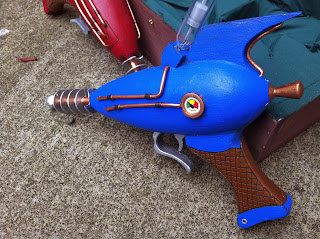
Both gun primed and in the base coat colours. Why Red and Blue? Because in the gaming world it is always Red Vs Blue. Plus I am a huge Team Fortress 2 fan.
The temperature gage detail
And the "other" gage detail. In this you can also see the holes that had been drilled out for the piping to go along the outside. I didn't build these into the prototype as I wanted to have the freedom of been able to add in piping where ever I though it would look good. It also means on future pulls I can change around their design as I see fit.
I don't know what this does, but it is set quite high!
Working out placement of the pistols in the display box.
This was a nightmare to make. Getting the shape just right. Cutting out the dozen or more wall pieces. Getting the green cloth lining to sit smoothly on it! The only way I was able to make it was using balsa wood, but that also make it hugely fragile.
This turned out almost the way I wanted it.
The display case, all varnished up and ready for shipping.
And here we have the finished props in their display case.
I learned a great deal from this build. What to do and of course what
not to do and more importantly what not to forget when you are at
certain stages of the build. I really hope that the people at Desert Bus like it and more importantly that it makes a decent amount for the chairity.
-Matty


.JPG)
+-+Copy.JPG)


.JPG)


.JPG)


.JPG)


.JPG)


.JPG)

